

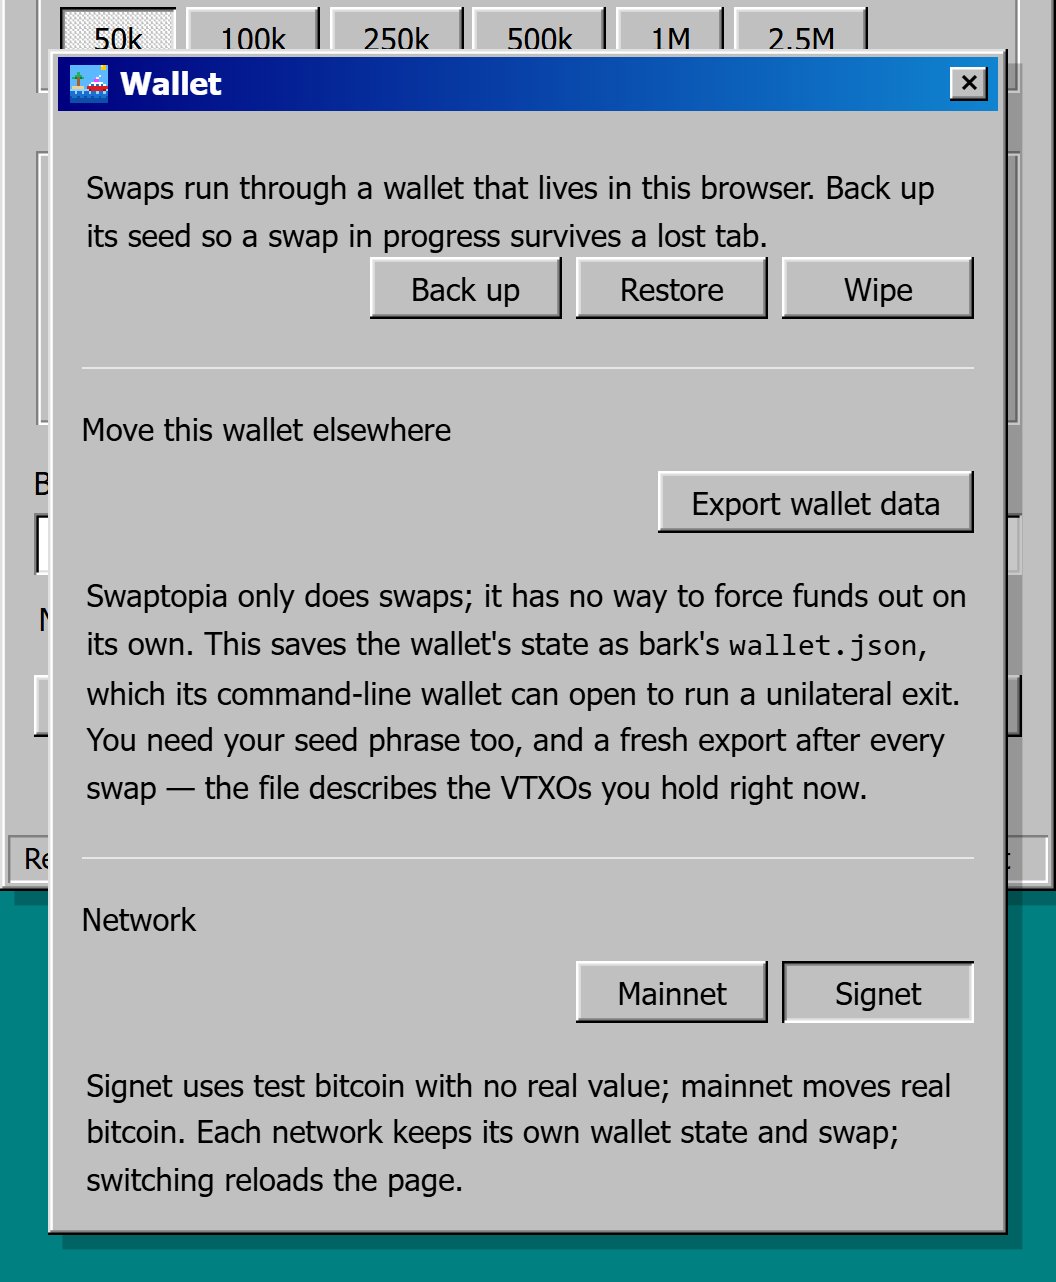
The wallet drawer holds the backup, restore, wipe, export, and network controls
Send leftover sats
Swaptopia shows sats left in the wallet in a banner on the swap screen: “N sats from an earlier swap are in this wallet. They join your next swap.” Leftover sats come from a failed payout you put off with Later, bitcoin that arrives after you cancel, a deposit over the maximum per swap, or a restore. Leftover sats join your next swap on their own. The quote then shows “Includes N sats already in this wallet from an earlier swap.” To send them out now instead:1
Set where the sats go
Select the Swap direction button until Lightning or Bitcoin, whichever you want, sits under You receive. The direction locks once you select Send now.
2
Select Send now in the banner
You send switches to This wallet, and a Lightning invoice or address or Bitcoin address field appears.
3
Paste the destination
A fixed-amount Lightning invoice must be for exactly the You receive figure. Swaptopia refuses any other amount and names the figure to use.
4
Select Swap
Swaptopia sends the sats and shows the receipt. To leave this mode without sending, select Back next to You send.
Keep leftover sats from expiring
Leftover sats have a limited lifetime on Ark. Each time you open Swaptopia while it holds sats, it makes sure a refresh is booked with the Ark server for about two days before they expire. The server runs the refresh whether or not this page is open. Swaptopia collects the refreshed sats the next time you open it. You need to act in three cases:- The drawer says it could not check when the sats expire: Open Swaptopia again later, so it can book the refresh.
- The drawer says no refresh could be booked: Open Swaptopia again before the expiry the drawer shows.
- A banner on the swap screen asks you to swap the sats out: The sats expire within about a week. Send them on their own, or let them join a swap before then. The banner appears even when Swaptopia has booked a refresh.
Restore your wallet from the seed phrase
Restoring pulls the wallet’s sats on Ark back from the Ark server’s records. You need the 12 words you wrote down when you backed up the wallet.1
Open the restore screen
Select Wallet > Restore.
2
Enter the 12 words
Type or paste the words in order, separated by spaces. Capitals and extra spaces do not matter. If Swaptopia shows “That is not a valid BIP-39 mnemonic.”, check the words and their order against what you wrote down.
3
Select Restore
Swaptopia shows “Restoring…”, replaces the wallet, and returns to the swap screen with a recovery banner.
The banner on the swap screen reports what the scan recovered
The scan recovers sats on Ark only. Bitcoin still waiting at a funding address stays on-chain. If it does not show up under Wallet, restore the seed phrase in an on-chain wallet app that supports taproot (BIP86) addresses to recover it.
Wipe the wallet from this browser
Wiping deletes the wallet from this browser, on mainnet and on signet, and creates a new one with a new seed phrase.1
Select Wipe
Select Wallet > Wipe.
2
Confirm the deletion
Your browser asks you to confirm. Select OK.
3
Back up the new wallet
Swaptopia shows “Wiping…”, then opens the swap screen with a fresh wallet. Back it up before you swap.
Export the wallet data for an emergency exit (optional)
If the Ark server stops cooperating, Swaptopia cannot move your sats out on its own. If you run the Bark CLI, this export and your seed phrase let you run an emergency exit instead. Select Wallet > Export wallet data. Swaptopia saves a file namedswaptopia-bitcoin-wallet-<YYYY-MM-DD>.json on mainnet (swaptopia-signet-wallet-<YYYY-MM-DD>.json on signet), in the format of the Bark CLI’s wallet.json. The file holds none of your wallet’s keys, so it cannot spend without your seed phrase. It does record your addresses and payment history, so keep it private.
Export again after every swap, and again just before you run an exit, with Swaptopia open for a moment first. Swaps and refreshes replace the VTXOs in the wallet. An older file lists VTXOs you no longer hold and misses the ones you hold now.
Run the emergency exit with the Bark CLI
Run the emergency exit with the Bark CLI
You need:The output lists the unspent VTXOs from your export, each with its
- Your 12-word seed phrase.
- The exported file.
- The Bark CLI installed on your computer.
1
Install the Bark CLI
Follow Install Bark CLI and check that
bark --version answers.2
Create a wallet from your seed phrase
This creates a data directory named
exit that uses Bark’s file storage, pointed at Second’s Ark server and Esplora. Replace the 12 words with your own.bark create contacts the Ark server. If the server does not answer, add --force to create the wallet without it. --force also deletes everything already in ./exit except config.toml and log files.3
Replace wallet.json with your export
Copy the exported file over
./exit/wallet.json, keeping that name. Bark opens wallet.json whenever it exists in the data directory.4
Check that the Bark CLI sees your sats
amount_sat. An empty list means the file did not copy, or the wallet held no VTXOs when you exported it.5
Fund the on-chain wallet for the exit fees
Exit transactions pay their miner fees from Bark’s own on-chain wallet, with confirmed sats only. Check what the exit needs, then get an address:Send at least the
exit_broadcast_fee_sat figure to that address, with a margin on top. The emergency exit walkthrough suggests at least 15,000 sats per VTXO. Wait for one confirmation before you start the exit.6
Start the exit for every VTXO
7
Progress the exit until it completes
--wait keeps the command running and rechecking every minute. Each VTXO needs several on-chain transactions to confirm, then a timelock to pass, so this can take hours or days. Without --wait, run the command again until its output reports "done": true.8
Claim the exited bitcoin
Send the exited bitcoin to an on-chain address you control:Bark broadcasts one transaction to that address. Once it confirms, the bitcoin is yours on-chain.
Test a swap on signet
Signet bitcoin has no value, so a mistake costs nothing.1
Switch to signet
Select Wallet, then Signet under Network. You can also open labs.second.tech/swaptopia/?net=signet. The page reloads with a signet pill in the header. Swaptopia stays on signet in this browser until you select Mainnet the same way. If a swap is in progress, Swaptopia asks you to confirm the switch. That swap pauses until you come back to mainnet.
2
Get signet sats from the faucet
Second’s faucet at signet.2nd.dev pays signet on-chain addresses and Lightning invoices once you sign in with GitHub.
- Bitcoin to Lightning: At the Send bitcoin stage, ask the faucet to send the amount shown to the funding address. Have a signet Lightning wallet app ready to create the invoice.
- Lightning to bitcoin: At the Pay this invoice stage, paste the invoice into the faucet. Have a signet
tb1…address ready to receive.
3
Run the swap